
Linux is a free, open-source operating system used by millions of people around the world. It is a great option for users looking for a secure, stable, and customizable operating system.
This tutorial will guide you step by step through the process of installing Linux on your computer. Let’s use Ubuntu as an example, but the instructions are similar for other Linux distributions.
Why install Linux?
You might want to install Linux on your computer for many reasons. Here are some of the main benefits:
- It is free and open source. This means you can use and modify it freely.
- It is safe and stable. Linux is known for its security and stability.
- It is customizable. You can customize Linux to meet your specific needs.
To install Linux, your computer/notebook will need to meet the following requirements:
- 64-bit processor
- At least 4 GB of RAM
- At least 20 GB of free hard disk space
- A USB drive (Pendrive) with at least 8 GB of free space
Part 1: Creating a bootable drive with UNetbootin
Before you can install Linux, you will need to create a bootable drive. This is a simple process that can be done using third-party software such as UNetbootin.
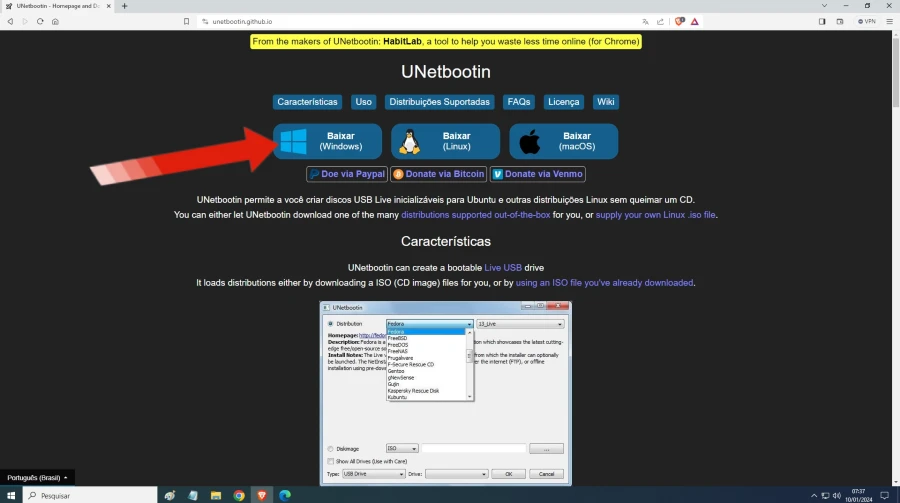
Step 1: Download UNetbootin
Step 2: Download the Ubuntu disk image (ISO)

Step 3: Install the Boot Manager
- Insert the USB flash drive into your computer.
- Run the UNetbootin executable file.
- In UNetbootin, select “DiskImage” and link to the ISO file you downloaded.
- Make sure you select the correct USB drive.
- Wait for the bootloader installation to complete and click “Exit” when finished.
Part 2: Installing Linux or Ubuntu on the computer

From the Ubuntu boot screen, you can start the installation process. To do this, follow the steps below:
Step 1: Boot Windows – Choose between Dual Boot or Replacement
- Select the desired option during the Linux distribution installation process.
Step 2: Open the Windows boot options menu
- Restart your computer, hold down the Shift key while selecting Restart, and choose “UEFI Removable Device” from the menu.
Step 3: Run the Ubuntu Installation Wizard
- The Ubuntu installation wizard will automatically launch from the USB.
Step 4a: Install Linux alongside Windows (Dual Boot)
- Choose “Install Ubuntu alongside the Windows Boot Manager” and follow the instructions.
Step 4b: Install Linux without Windows
- Select “Erase disk and install Ubuntu” if you want to replace Windows.
Step 5: Complete the Installation Wizard and Restart the Computer
- Provide information such as keyboard layout, network configuration, and password, complete the wizard, and restart your computer.
Step 6: Select Ubuntu from BIOS Menu (If using Dual Boot)
- If you have configured dual boot, choose Ubuntu and Windows in the BIOS boot menu.
Step 7: Access the Linux Interface
- Explore the Ubuntu user interface. Pre-installed applications may include a calculator, calendar, webcam, and media player.
Installing Linux or Ubuntu on a non-Windows computer
If you are going to install Linux on a computer that does not have an operating system (clean HD/SSD), follow the steps below:
Step 1: Insert the Bootable USB and Turn on the Computer
- Insert the bootable USB and turn on your computer.
Step 2: Run the Ubuntu Installation Wizard
- Follow the installation wizard instructions, selecting “Erase disk and install Ubuntu” for a clean installation.
Step 3: Complete the Installation Wizard and Restart the Computer
- Provide the required information, complete the wizard, and restart your computer.
Step 4: Access the Linux Interface
- Explore the user interface of Ubuntu, now installed in a clean configuration.
When you finish configuring the installation options, the Linux installer will complete the installation. The computer will restart and Linux will start.
Configuring Linux/Ubuntu after installation

The rest of the installation is simple and consists of configuring the following options:
- Keyboard Layout: Select the keyboard layout you want to use.
- Time zone: select the correct time zone.
- Username and password: Enter a username and password for your Linux user account.
After your computer restarts, you will be taken to the Linux desktop environment. You can start using Linux now.
Troubleshooting:
If you’re having trouble installing Linux, here are some things you can try:
- Make sure your computer meets the minimum system requirements.
- Check if the USB drive is bootable.
- Try booting your computer from the USB drive again.
- Select a different installation option.
If you’re still having trouble, you can find help online on Linux forums and support sites.
Learn more about Linux and Ubuntu:
Linux is a complex operating system, and many resources are available to help you learn more about it. Here are some resources to get you started:
You now have Linux installed on your computer, either in a dual boot configuration or a clean install. Customize according to your preferences and enjoy the Linux environment!