
Are you dealing with software glitches or perhaps bricked your Samsung device while attempting to update the firmware? Don’t panic, Odin is here to assist you! This post will walk you through everything needed to use Odin to flash or update firmware on your Samsung device.
From downloading Samsung firmware binaries (BL, AP, CP, and CSC) to using the latest Odin and preparing your device for flashing, we’ve got you fully covered. Keep reading to learn more about how you can utilize Odin to install or update firmware on your Samsung device!
What is Odin?
Odin is a portable Windows PC utility that doesn’t require installation. This firmware flashing tool is quite easy to use. All you need to do is download the latest Samsung Odin, firmware binaries, reboot your device into the download mode, and install the firmware. If you need a more detailed explanation of each step for flashing the firmware on your Samsung Galaxy phone or Galaxy Tab, no worries, we have got you sorted out.
When Should You Use Samsung Odin?
Odin is a Windows-based tool developed by Samsung for flashing firmware and software images onto Galaxy devices. Advanced users and developers also utilize Odin for manually flashing stock ROMs, kernels, mods, and custom recoveries like TWRP.
Downgrade Software: If a recent update has removed a critical function or caused app compatibility issues, you can use Odin to downgrade your Samsung device to an earlier firmware version.
Fix Boot Loop: Occasionally, a rogue app or a problematic software update may trigger a boot loop, causing your Samsung device to become stuck on the Samsung logo. Flashing the full firmware with Odin can resolve this issue.
Change CSC: If you’ve purchased a pre-owned or internationally bought Samsung phone, your native language and other regional settings might be missing. You can use Odin to manually change your Samsung device’s CSC, restoring missing localizations. Refer to a Samsung CSC code list for more information.
Manually Update Software: For individuals who’ve purchased a Samsung Galaxy device in one country and later relocated, official OTA updates might not be available. In this situation, you can download and manually install the latest Samsung firmware for your device using Odin.
Install Custom Recovery: Odin is also capable of installing custom recoveries, such as TWRP or modified kernels, on Samsung devices.
Preparations to be Made
Using a Samsung smartphone or tablet? You may already know that Odin is the go-to tool for installing or updating the device’s firmware. However, it’s essential to set up a few things before Odin can be used successfully.
Firstly, install the most recent Samsung USB driver for Windows on your computer.
Additionally, download and extract the zip file for the latest Samsung Odin flash tool. If you’re using an older Samsung phone and are uncertain about which version of Odin to use for flashing an older firmware, refer to our guide. For applying a modified firmware, use the Patched version of Odin, or the developer’s recommended version.
- Emerging as a critical step is downloading the correct firmware binary for your Samsung device.
- This can be done using tools like Frija, SamFirm, or Samloader.
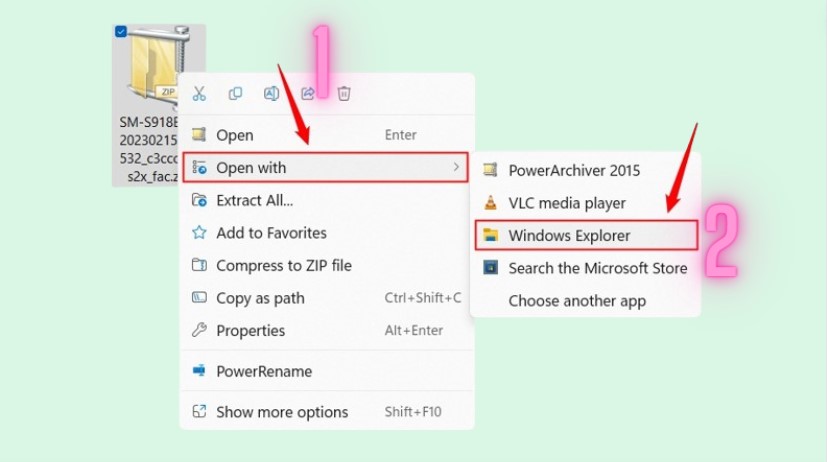
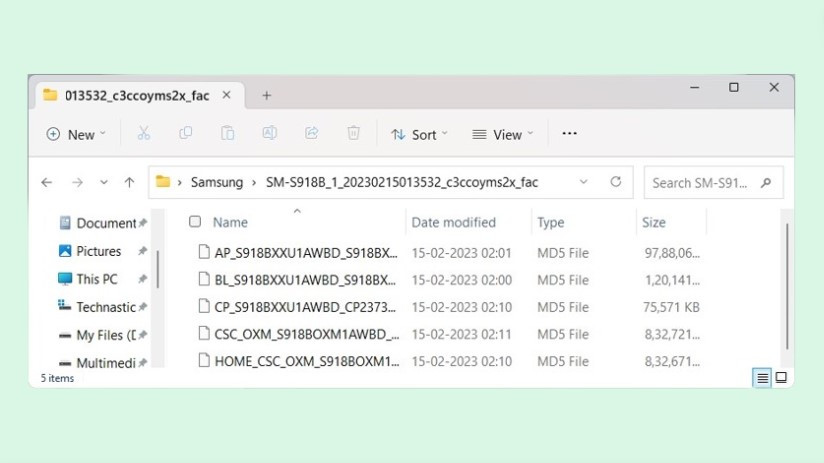
- Once the firmware is downloaded, extract the zip file to receive the five firmware binaries i.e., AP, BL CP, CSC, and HOME\_CSC. You can use utilities like WinZip, 7Zip, PowerArchiver, or simply the Windows File Explorer to extract the firmware.zip file.
- Right-click the zip file and opt for the ‘Open with > Windows Explorer’ option.
- Click on ‘Extract all’, select your preferred location for the firmware binaries, and then hit ‘Extract’.
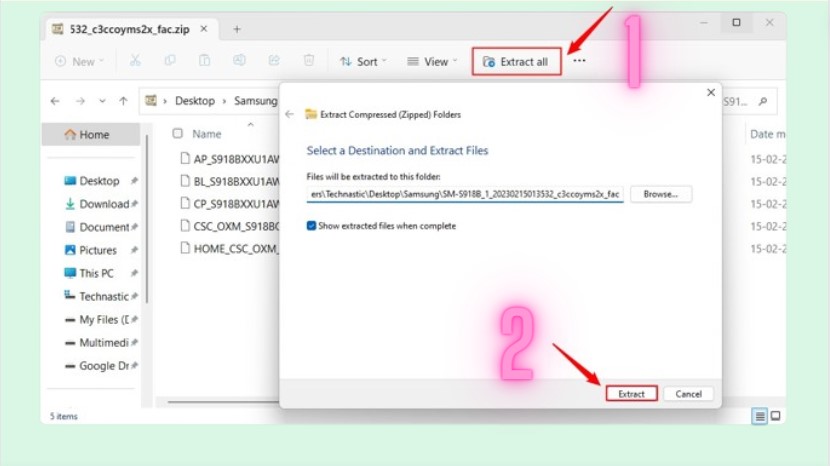
- Now, all the firmware files are prepared and ready to be flashed using Odin.
Before flashing the stock firmware onto your Samsung Galaxy phone or tablet, be aware that it may erase data including contacts, call logs, pictures, videos, documents, and more. Therefore, ensure you back up all your necessary data beforehand.
- Ensure your device is adequately charged, we’d recommend a battery level of 50% or above.
- Activate USB debugging through the ‘Developer options’.
- Reboot your device in ‘Download’ or ‘Odin Mode’; the method may vary based on your device model.
- Also, a compatible USB cable is necessary – ideally, use the one supplied with your phone to prevent any potential connection issues.
- Remember, Odin is a Windows-only flash tool, so a computer is required for flashing your Samsung device.
Steps to Flash Samsung Firmware with Odin
After preparing as stated above, it’s time to flash the firmware binaries onto your Samsung Galaxy smartphone or tablet. Here’s the process:
Run the ‘Odin3_v3.14.4.exe’ as an administrator, located in the ‘Odin3 v3.14.4’ folder. When the warning pop-up appears, click ‘OK’ to initiate Odin.
Next, boot your Samsung device into the ‘Download Mode’. For Samsung devices released post-2021, here’s how you can enter ‘Download Mode’:
- Power off your device.
- Connect the device to your computer with a USB cable.
- Once the charging animation ceases, hold the ‘Volume Up’ and ‘Volume Down’ buttons simultaneously for about 5-7 seconds.
- A warning screen will appear.
- To enter ‘Download Mode’, press the ‘Volume Up’ key.
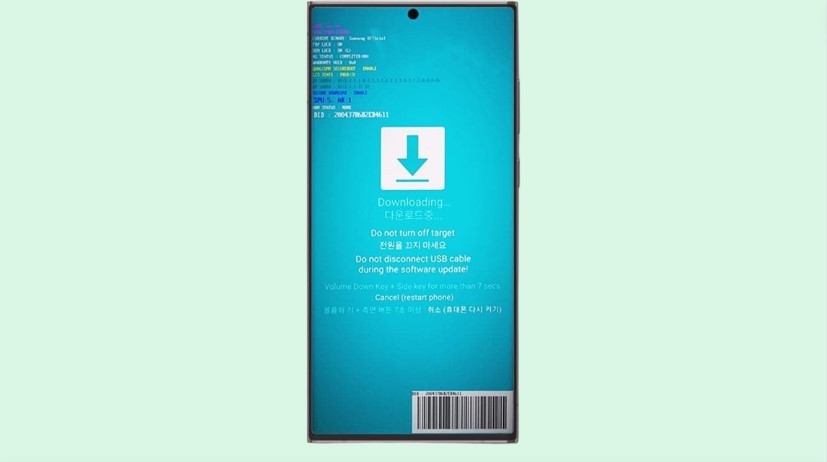
- When your device initiates ‘Download Mode’, ensure that the USB cable remains connected, allowing Odin to detect it.
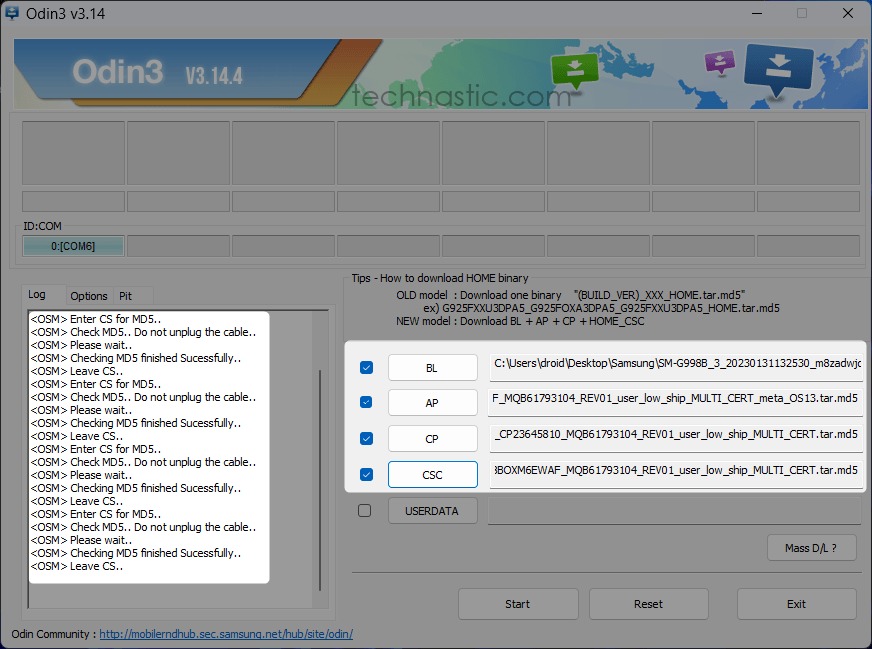
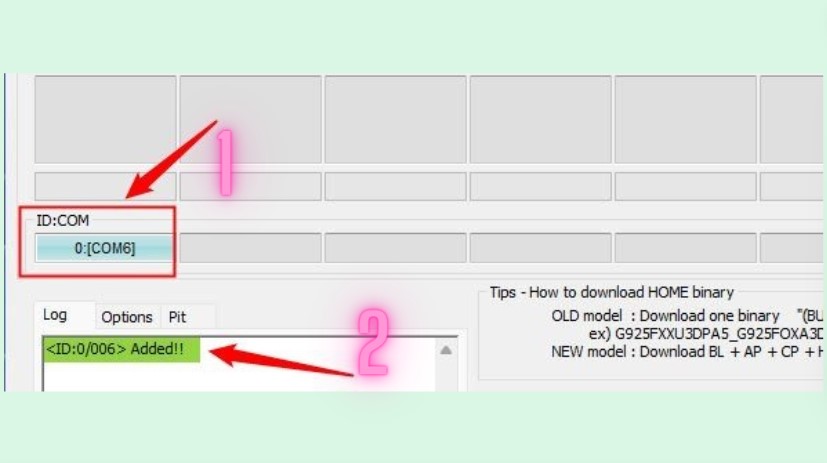
- As soon as Odin identifies your Samsung phone, the ‘ID: COM’ port gets highlighted, and you’ll see ‘Added!!’ in the Odin log.
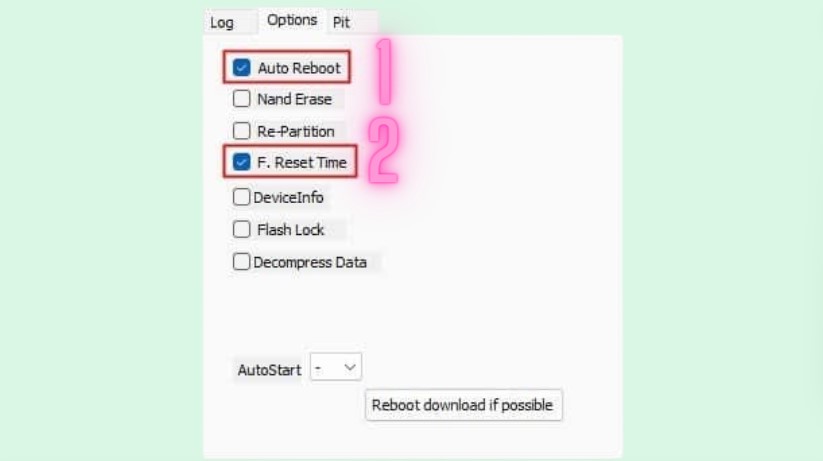
- In Odin, click on ‘Options’ adjacent to the ‘Log’ tab and verify that both ‘Auto Reboot’ and ‘F. Reset Time options are selected.
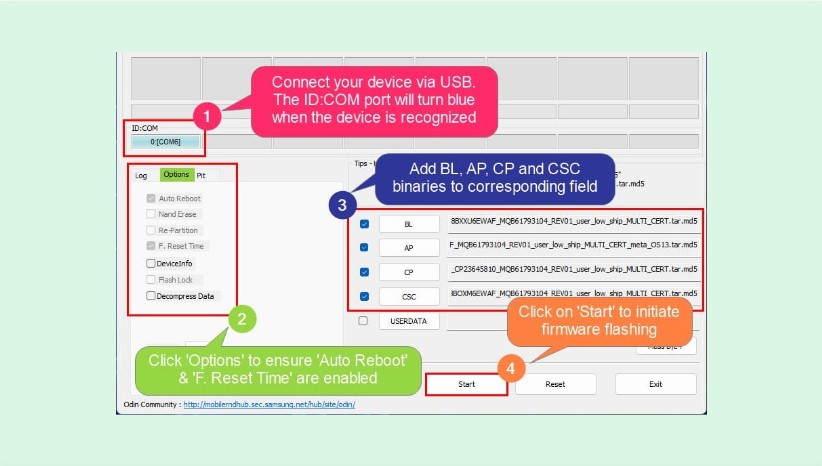
- Now, it’s necessary to add the firmware binaries to the Odin flash tool. Start by clicking the ‘BL’ button, then find the folder containing the extracted firmware files – they’ll have a ‘.tar.md5’ extension. Choose the binary that begins with ‘BL\_’.
- Next, select ‘AP’, then find and add the firmware file starting with ‘AP\_’. Due to the AP binary’s large size, expect it to take several seconds to load.
- Then, select ‘CP’ and attach the CP binary.
- Finally, select the ‘CSC’ button in Odin and choose either the ‘CSC’ or ‘HOME\_CSC’ file. For a clean install, choose ‘CSC’.
- But, if you prefer not to wipe your phone’s data, choose ‘Home\_CSC’.
- Odin will verify the MD5 checksum for each firmware file. Once all four firmware binaries are loaded, the Odin window should look as expected.

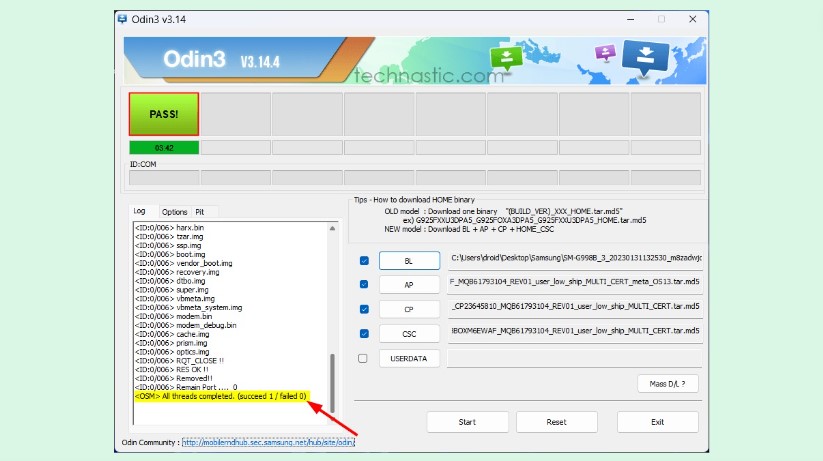
Lastly, verify that your Odin screen matches the following display. When you’re ready, click ‘Start’ to commence the firmware flashing process.
- Odin will begin installing the firmware files, a process that typically takes between 3-5 minutes, so be prepared for a brief wait.
- Once the firmware flashing concludes, ‘PASS!’ will appear in the status box in Odin. The log section’s final entry will state, ‘All threads completed. (succeed 1 / failed 0).’ Both of these signals confirm successful firmware installation on your Samsung device.
- If the firmware installation fails, please refer to our comprehensive guide for resolving the ‘complete(write) operation failed’ error in Odin.
You can now safely disconnect your device. Your phone or tablet will reboot automatically. Keep in mind that the first boot may take longer than usual, so there’s no need to worry.
Fixing Boot Loop After Odin Flash
Odin flashes usually complete successfully, allowing Samsung devices to boot as expected. However, there can be instances where flashing firmware on Samsung devices results in a boot loop. This can occur when users opt for the ‘Home_CSC’ file to avoid wiping the device data.
Additionally, using the standard version of the Odin flash tool to install patched firmware can potentially prevent proper device boot-up. In some cases, a device might unjustifiably freeze on the Samsung logo screen following an Odin flash.
Regardless of the cause, you can remedy a boot loop issue by following these steps in the sequence below:
- Clear cache partition via Recovery Mode.
- Conduct a data factory reset through Recovery Mode.
- Reinstall the original firmware using Odin.
Clearing Cache Partition from Recovery Mode
- If your Samsung device is currently stuck in a boot loop, power it off by holding the power button for 5-7 seconds.
- Connect your phone or tablet to a computer. Then, press and hold the ‘Volume Up’ and ‘Power’ keys simultaneously.
- Release both keys when the Samsung logo appears.
- In Recovery mode, touchscreen capability is disabled. You’ll need to use the volume keys for navigation and the power button to select options.
- Use the ‘Volume Down’ key to navigate to the ‘Wipe cache partition’ option. To confirm your selection, press the ‘Power’ button.
- On the next screen, confirm your choice by selecting Yes.
- Now, select the Reboot system option.
- Your Samsung device should boot normally now.

Performing a Data Factory Reset via Recovery Mode
If the boot loop issue persists after clearing the cache partition, you might want to try a hard reset via Recovery mode. Keep in mind, that this method will erase all data stored on your device.
- Boot your Samsung phone into Recovery mode. Follow the instructions provided in the previous method.
- Navigate to the ‘Wipe data/factory reset’ option and press the ‘Power’ button to select it.
- Confirm your selection by choosing ‘Yes’ on the subsequent screen. This will initiate the reset process.
- Once the reset is complete, select the ‘Reboot system now’ option to restart your phone.
- After these steps, the boot loop issue on your Samsung device has likely been resolved.
Reinstall the Stock Firmware Using Odin
If you are still stuck with a Samsung phone with a black screen and Samsung logo, installing the stock firmware with Odin is your last resort. Just follow the Odin firmware flashing steps described at the beginning of this tutorial.
However, this time you must use the CSC (not the Home_CSC) file along with other firmware binaries.