ADB Sideload is a useful feature that allows you to flash or install ZIP files on your Android device from your computer. You can use this feature in both stock and custom recovery modes, such as TWRP.
For example, you can use ADB Sideload to install official OTA updates from your device manufacturer or to flash custom ROMs or mods from third-party developers. In this guide, we will explain how to use ADB Sideload in both scenarios and what are the prerequisites and steps involved. Let’s get started.
What is ADB Sideload in Android
ADB sideload is a feature that lets you install or flash ZIP files on your Android device with a single ADB command. You might use this feature for different purposes, depending on your needs. For example, some users use it to flash mods and tweaks that come in ZIP packages, while others use it to manually install OTA updates.
However, there are some limitations to this feature. First, you can only install ZIP files with it, not other types of files. Second, if you are using it with TWRP, you should know that it does not transfer files from your PC to your device. It only installs the ZIP file on your device.
If you want to transfer files, you should use other TWRP options, such as Mount, MTP, and so on. The same applies to stock recovery. The OTA update file will be installed on your device directly, without being transferred first.
We hope this explanation helps you understand the adb sideload command and its usefulness. Now let’s see how to use ADB Sideload in Android and install ZIP files in stock and TWRP Recovery. The steps are slightly different for each method, so we have divided them into separate sections. Follow along.
How to Use ADB Sideload in Android via Stock Recovery
The following instructions will guide you to install ZIP via adb sideload and TWRP or stock recovery on your device. This process may erase or modify your data, so we strongly recommend that you create a backup of your device’s data before proceeding. Droidwin and its members are not liable for any damage or loss that may occur to your device or data as a result of following these instructions. Please proceed at your own risk.
Download Android SDK Platform Tools
To begin with, you need to get the Android SDK Platform Tools on your PC. This is the official and reliable source of ADB and Fastboot binary from Google. You can download it and then unzip it to any suitable location on your PC. This will give you the platform-tools folder, which is essential for this guide.
Enable USB Debugging
To access Recovery Mode, you need to turn on USB Debugging in your device settings. This will let your PC communicate with your device through ADB commands. Follow these steps to enable USB Debugging: Go to Settings > About Phone > Tap on Build Number 7 times. Then go back to Settings > System > Advanced > Developer Options > Turn on USB Debugging.

Download Firmware/OTA
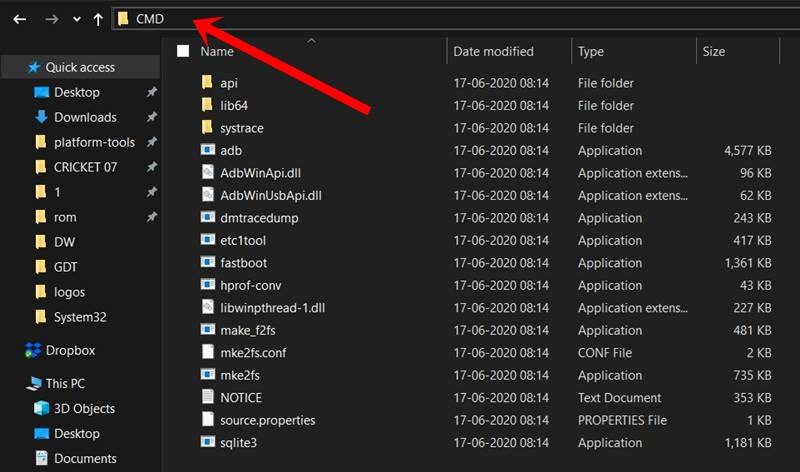
The next step is to get the OTA/Factory Image file for your device. You can find it on the official website of your device or on a reliable third-party website. After you download the file, move it to the platform-tools folder on your PC.
![]()
- Likewise, rename the file to update, so that the complete name becomes update.zip.
- This renaming is done just to make the file name easier to type in Command Prompt.
Boot Device to Recovery
- Connect your device to the PC via a USB cable. Make sure USB Debugging is enabled.
- Then head over to the platform-tools folder, type in CMD in the address bar, and hit Enter. This will launch the Command Prompt.
- After that, type in the following command in the CMD window to boot your device to the stock recovery
adb reboot recovery
- Your Pixel 8/Pro will now boot to the No Command screen.
To exit this screen, press and hold the Power Button and while doing, so press and release the Volume Up key and then release the Power key as well. You will now be taken to the stock recovery.
Use ADB Sideload to Manually Install OTA Update
Once your device boots to stock recovery, use the Volume keys to select the “Apply Update from ADB” option and press the Power key to confirm.
- You should now see a message along the following lines on your device:
- Now head over to the platform-tools folder, type in CMD in the address bar, and hit Enter. This will launch the Command Prompt.
- Type in the following command in the CMD window to verify the ADB Sideload Connection:
adb devices
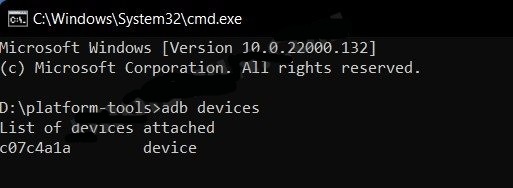
- If you get the sideload keyword in the Command Prompt, then the connection stands successful and you may proceed ahead.
- So go to the CMD window (that you have opened inside platform-tools) and type in the below command to install the file:
adb sideload update.zip
- In the above command, update.zip is the name of the file to be flashed (rename it accordingly, if needed). The installation process shall now begin and could take a few minutes.
- Once done, use the Volume keys to select the Reboot System Now option and press the Power key to confirm it.
You have successfully updated your device with the ADB sideload command in the stock recovery mode. Congratulations! Now you can enjoy the new features and improvements of the latest software version. In this guide, we also show you how to use the ADB sideload command in the custom development mode i.e. TWRP Recovery.
How to Use ADB Sideload in TWRP Recovery
Sideload in TWRP allows you to flash ZIP files that are not necessarily firmware updates. For instance, you can use it to install Magisk Modules or Custom ROMs. However, this feature is not as reliable as the Install option in TWRP, and some developers may require you to use Sideload only. Therefore, you should always follow the instructions given by the developer before using Sideload.
Install Android SDK Platform Tools
To begin with, you need to get the Android SDK Platform Tools on your PC. This is the official source of ADB and Fastboot binary from Google and it is the only one we recommend. Download it and then unzip it to any location you prefer on your PC. This will give you the platform-tools folder, which we will use throughout this guide.
Unlock the Bootloader
Before you can install a custom recovery like TWRP on your device, you need to unlock its bootloader. This is a mandatory step, but it will also erase all your data and may void your warranty. Therefore, you should backup your important files and be aware of the risks. To learn how to unlock the bootloader of any Android device, follow our guide below.
Install TWRP Recovery
Next up, you will also have to install TWRP Recovery on your Android device. To do so, there are two different approaches- you could either temporarily install TWRP for one-time usage or permanently install it. Here are the instructions for both:
- – To temporarily install TWRP, you need to boot your device into fastboot mode and then use the command `fastboot boot twrp.img` where `twrp.img` is the name of the TWRP image file you downloaded. This will launch TWRP on your device without overwriting the stock recovery.
- – To permanently install TWRP, you need to boot your device into fastboot mode and then use the command `fastboot flash recovery twrp.img` where `twrp.img` is the name of the TWRP image file you downloaded. This will replace the stock recovery with TWRP on your device.
Boot Android Device to TWRP Recovery
- Connect your device to the PC via USB cable. Make sure USB Debugging is enabled.
- Then head over to the platform-tools folder, type in CMD in the address bar, and hit Enter. This will launch the Command Prompt.
- Type in the following command in the CMD window:
adb reboot recovery
Your device will now boot to the TWRP Recovery. You may now proceed to the next step to flash the required ZIP file via adb sideload and TWRP.
Root your device [Optional, Depends on the File Type]
The next step is optional and depends on the type of ZIP files that you want to flash via adb sideload and TWRP. If you want to flash a custom ROM, then you don’t need to root your device. However, if you want to flash a Magisk module or any similar mods, then rooting is required. For this, you can follow our guides below:
Install ZIP via TWRP ADB Sideload
- First off, transfer the required ZIP file to the platform tools folder on your PC.
- Furthermore, rename it to something shorter, say mod.zip so that it becomes easier to type in the CMD window.
- Likewise, type in CMD in this folder’s address bar to open Command Prompt.
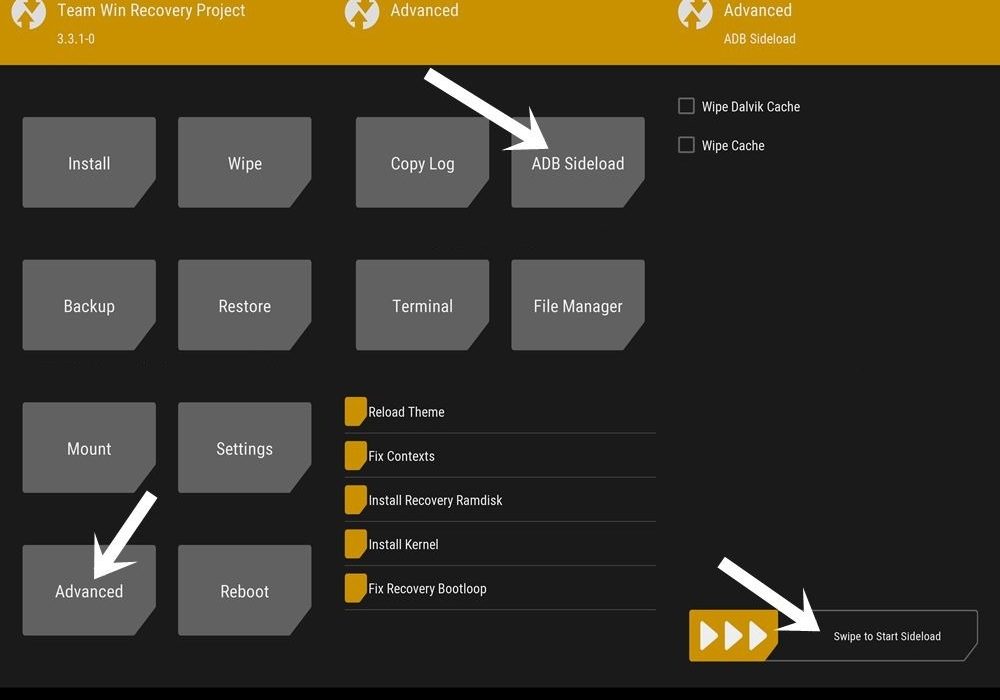
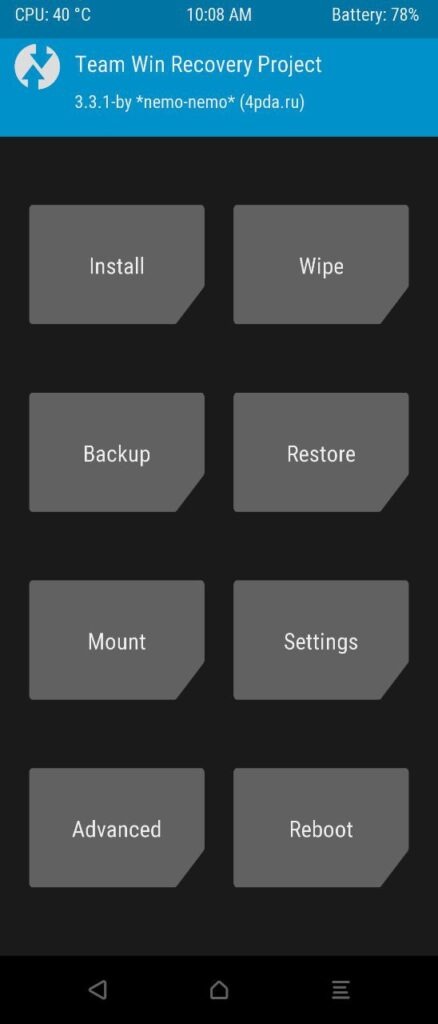
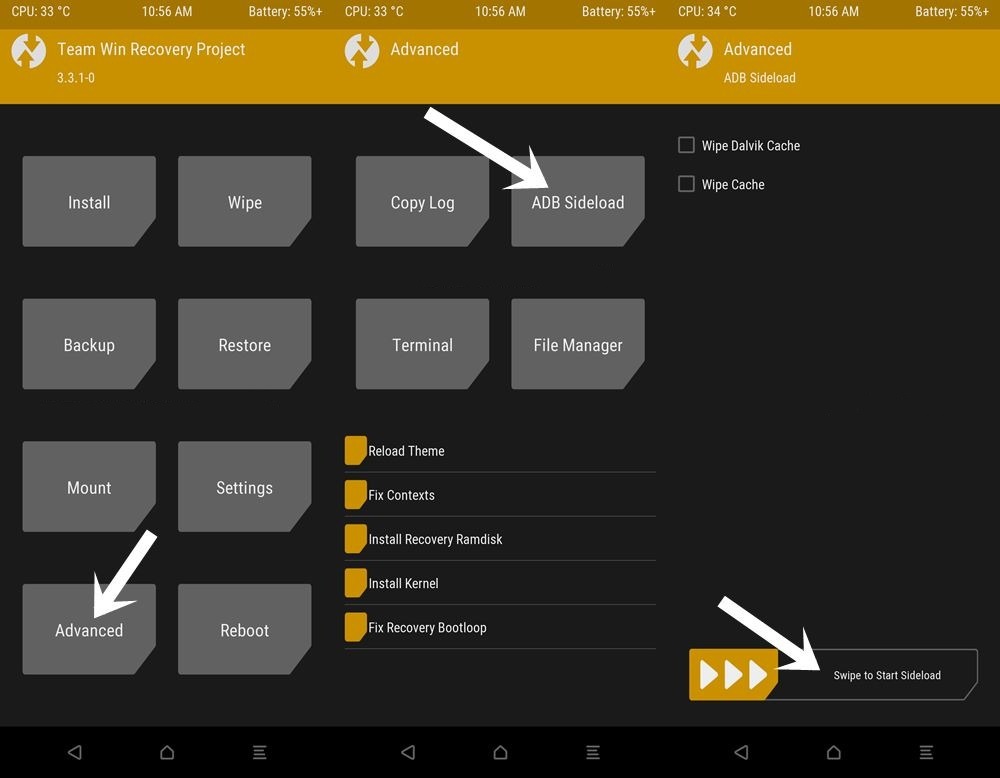
- Now from the TWRP’s home screen, go to Advanced and select ADB Sideload.
- Then perform a right swipe on the Swipe to Start Sideload button situated at the bottom.
- After this, go to the CMD window type in the below command, and hit Enter.
adb sideload mod.zip
- In the above command, mod.zip is the name of the file being flashed via TWRP.
- Once the flashing is complete, you may reboot the device to OS via the Reboot > System option in TWRP.
How to Use ADB SIdeload in AOSP Recovery
Many custom ROMs have their own recovery integrated with them, such as LineageOS, Pixel Experience, etc. The developers of these ROMs advise you to use their recovery to flash their ROM. However, these recoveries do not have the Install option, instead you have to use the Sideload feature. The procedure for that is similar to what we have explained above, but for your convenience, here is how it works:
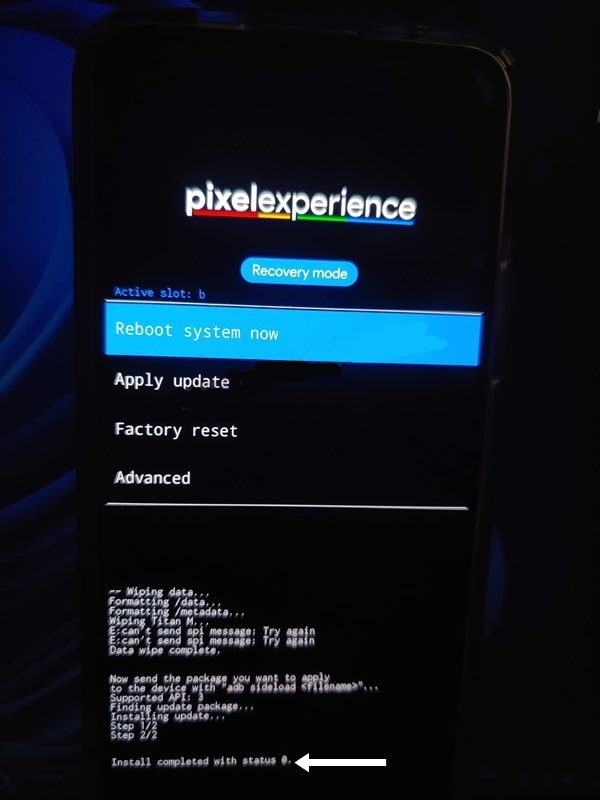
- From the Pixel Experience Recovery, go to Apply Update > Apply from ADB.
- Then head over to the platform-tools folder, type in CMD in the address bar, and hit Enter.
- This will launch the Command Prompt. So type in the below command to flash the ROM file via Sideload:
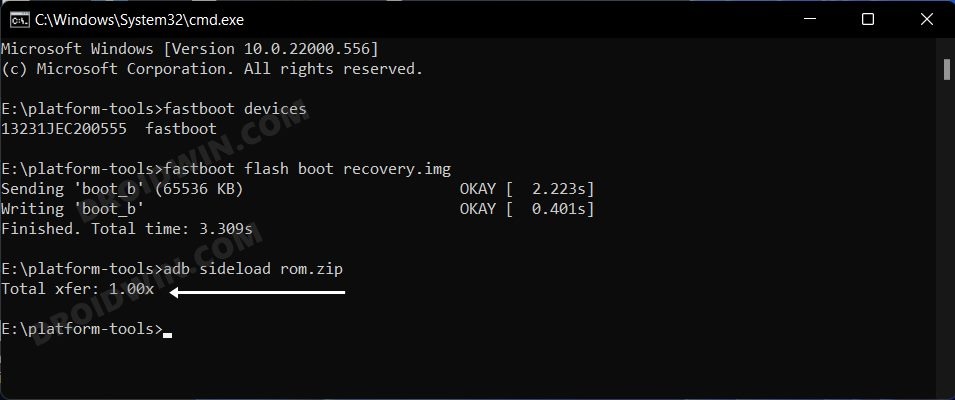
adb sideload rom.zip
The process will now begin and once done, you shall get the Total xfer: 1.00x message [Got an error? See FAQ below].
- Now go back to the home screen of the recovery and select Reboot System Now. Your device will now boot to the newly installed OS.
You have successfully completed the process. This concludes the tutorial on how to use the adb sideload command on both the stock and custom TWRP Recovery on your Android device. If you have any questions about the steps, please leave a comment. We will try to help you as soon as possible.