

Unlocking the bootloader is the first step for anyone who wants to explore the world of custom development on their Android device. By doing so, you will be able to flash custom binaries, mods, ROMs, and recoveries that can enhance your device’s performance and functionality.
However, unlocking the bootloader also comes with some risks that you should be aware of before proceeding. For instance, you might lose your warranty, and data, or even brick your device if something goes wrong. Therefore, you should only attempt this process if you are confident and have a backup of your important files.
In this guide, we will provide detailed instructions on unlocking the bootloader on your Android device. Please note that the steps may vary depending on your device model and manufacturer, so follow the appropriate ones for your device. Let’s begin.
Benefits and Risks of Unlocked Bootloader
Android’s open-source ecosystem offers many advantages for users who want to customize their devices. One of the first steps to do so is unlocking the bootloader, which enables you to flash different firmware and software on your device. For instance, you can install a custom ROM that may offer better performance, features, or security than the stock one.
You can also flash a custom recovery like TWRP, which gives you more options to backup, restore, and modify your device. Furthermore, you can root your device using Magisk, which grants you superuser access to the system partition and allows you to install various mods and tweaks. Some examples of these are Magisk Modules, Xposed Framework, Substratum Themes, and Viper4Android, which can enhance your device’s functionality, appearance, and sound quality.
Before proceeding with these modifications, you should know the possible drawbacks. First of all, you will lose all your data and may void the warranty of your device. Moreover, you will downgrade the Widevine L1 certification to L3, which means you cannot stream HD content.
The SafetyNet will also fail, which means you cannot use banking apps. If you are okay with these consequences, then follow the steps below to unlock the bootloader on your Android device.
How to Unlock the Bootloader of Android Devices
Hey, before you start messing with your device, read this carefully. I’ve divided the instructions into sections so you can follow them easily. But don’t skip any steps or do them in a different order, okay? I’m not responsible if you end up starting World War III, oversleeping for work, or bricking your device and losing your data. You’re doing this at your own risk, got it?
1: Install Android SDK
The first step is to get the Android SDK Platform Tools on your computer. This is the official toolset for ADB and Fastboot commands from Google and it is the only one we recommend. You can download it and then unzip it to any folder you like on your computer. This will create a platform tools folder, which we will use throughout this guide.
2: Enable USB Debugging and OEM Unlocking
To proceed further, you need to activate two settings on your device: USB Debugging and OEM Unlocking. USB Debugging allows your PC to communicate with your device in ADB mode, which is necessary to enter Fastboot Mode. OEM Unlocking enables you to unlock the bootloader of your device, which is the next step in the process.

So head over to Settings > About Phone > Tap on Build Number 7 times > Go back to Settings > System > Developer Options > Enable USB Debugging and OEM Unlocking.
3: Boot Device to Fastboot Mode
- Now connect your device to the PC via a USB cable. Make sure USB Debugging is enabled.
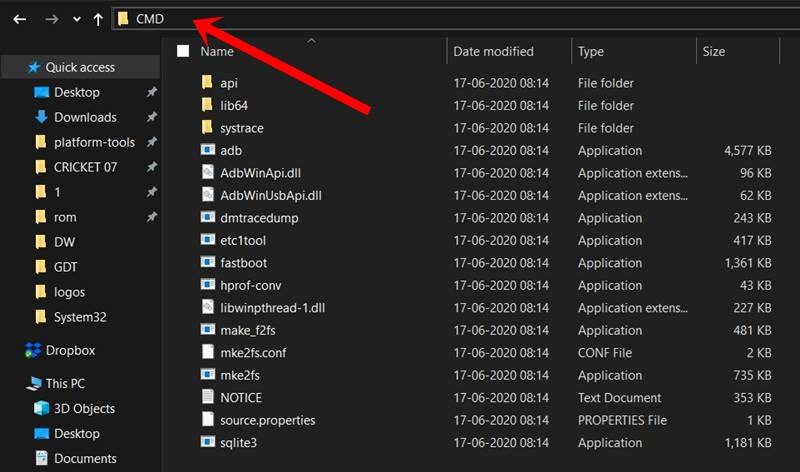
- Then head over to the platform-tools folder, type in CMD in the address bar, and hit Enter. This will launch the Command Prompt.
Type in the following command in the CMD window to boot your device to Fastboot Mode
adb reboot bootloader
To verify the Fastboot connection, type in the below command and you should get back the device ID, as shown in the image.
fastboot devices

if you are not getting any serial ID, then please install the Fastboot Drivers on your PC.
Unlock the Bootloader via Fastboot Command
- Type in the following command to unlock the bootloader on your Pixel 8/Pro:
fastboot flashing unlock
![]()
- On devices launched before 2015, you might have to use the below command instead:
fastboot oem unlock
You will now get a confirmation message on your device. Use the Volume keys to select Unlock the Bootloader option, and the Power key to confirm your decision.
- Your device will now reboot to Fastboot Mode, but this time, the Device State will be Unlocked. This verifies that the process stands completed.
- You may now reboot your device to the system (if that doesn’t happen automatically). For that either press the Power key once or use the below fastboot command:
fastboot reboot
Unlock Critical Partitions on Android
Some Android devices have additional security measures that prevent modifying the critical partitions on your device. These partitions contain essential system files and bootloaders that are needed to run the device. To unlock these partitions, you need to follow a specific procedure that will erase all the data on your device. Here are the steps to unlock the critical partitions on your device [please backup your data before proceeding].
- To begin with, boot your device to Fastboot Mode, as explained above.
- Then execute the below command to unlock the critical partitions on your device
fastboot flashing unlock_critical
- You might now get a confirmation message on your device. Use the Volume keys to select the Unlock the Bootloader option and hit the Power key to confirm it.
- Finally, execute the below command to boot your device to the OS
fastboot reboot
- That’s it. The bootloader as well as the critical partitions on your device is now unlocked.
OEM Specific Bootloader Unlock Guide
Some smartphone manufacturers have different methods for unlocking the bootloader, as we explained in the introduction. For instance, Realme needs an In-Depth APK, Samsung requires disabling Vault Keeper, Sony asks for device-specific code, and so on. Therefore, we have prepared a separate guide for these OEMs below. Please check it out:
You have completed the bootloader unlocking process on your Android device. Congratulations! If you encounter any issues or have any questions regarding the steps we have provided, please feel free to leave a comment below. We will try our best to assist you as soon as possible.