
Hey, welcome to this tutorial where we’ll teach you how to unlock the bootloader on your Pixel 7A. This phone is the latest and greatest from Google, and it has some awesome features like wireless charging and a smooth 90hz screen [but it also costs more than the previous model]. If you’re into customizing your phone with custom ROMs, kernels, mods, and more, then you’ll need to unlock the bootloader first. Don’t worry, it’s not hard and we’ll guide you through the whole process.
The Pixel 7A is the latest addition to the popular Pixel series of smartphones. It offers a pure Android experience with timely updates and security patches. It also has a lot of potential for customization and modification, thanks to the availability of various custom ROMs that can be installed via Fastboot or AOSP-based recoveries.
Moreover, you can root your device with Magisk and enjoy the benefits of having root access. However, before you can perform any of these actions, you need to unlock the bootloader on your Pixel 7A. This guide will help you with the steps to do that.
Benefits and Risks of Unlocked Bootloader on Pixel 7A
If you want to make the most of Android’s open-source nature, you need to unlock the bootloader first. This will enable you to install custom ROMs or flash custom recoveries like TWRP. You will also gain access to the system partition and root privileges by rooting your device with Magisk. This will open up a world of possibilities, such as installing Magisk Modules, Xposed Framework, Substratum Themes, and Viper4Android among others.
How to Unlock Bootloader on Google Pixel 7A
The following steps are divided into different sections for clarity. Do not deviate from the order they are given. Droidwin and its members are not liable for any consequences, such as a thermonuclear war, a missed alarm, or any damage to your device and data, that may result from performing these steps.
Prerequisites
1: Install Android SDK
The first step is to get the Android SDK Platform Tools on your computer. This is the official toolset for ADB and Fastboot from Google and it is the only one we recommend. You can download it and then unzip it to any folder you like on your computer. This will create a platform tools folder, which we will use throughout this guide.
![Android SDK Platform Tools For [Windows/Mac/Linux]](http://tipshut.com/wp-content/uploads/2024/02/android-sdk-platform-tools.jpg)
2: Enable USB Debugging and OEM Unlocking on Pixel 7A
To proceed further, you need to activate two settings on your device: USB Debugging and OEM Unlocking. USB Debugging will allow your PC to communicate with your device in ADB mode, which is necessary to enter Fastboot Mode. OEM Unlocking will enable you to unlock the bootloader of your device. These are the steps to do so.
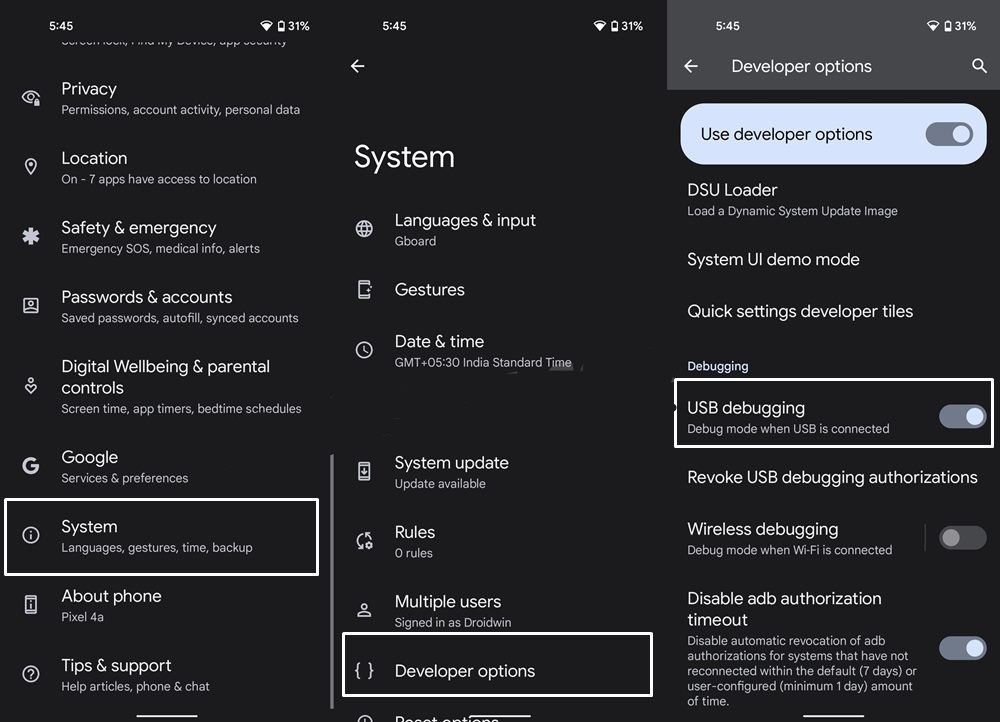
To access the developer options on your phone, follow these steps:
- – Go to Settings and select About Phone.
- – Tap on Build Number repeatedly until you see a message that says “You are now a developer”.
- – Go back to Settings and select System.
- – Tap on Developer Options and turn on USB Debugging and OEM Unlocking.
Boot Pixel 7A to Fastboot Mode
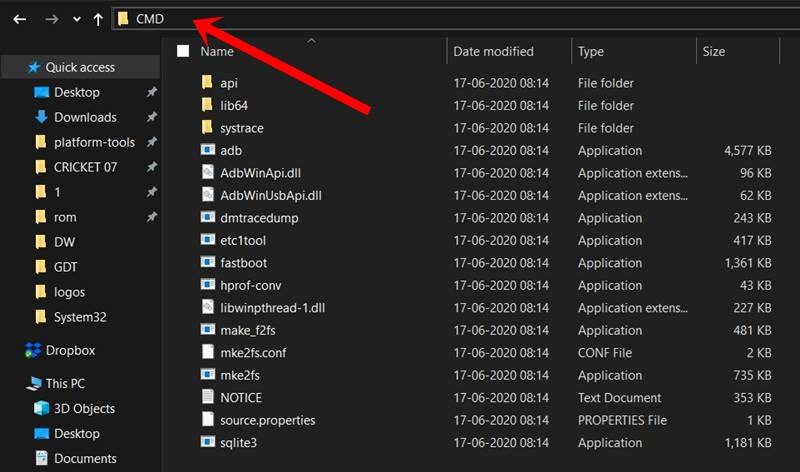
- – Connect your device to the PC via a USB cable and enable USB Debugging on your device.
- – Navigate to the platform-tools folder on your PC, type CMD in the address bar, and press Enter. This will open the Command Prompt window.
- – To unlock the bootloader of your Pixel 7 Pro, enter the following command to boot your device to Fastboot Mode:
- – adb reboot bootloader
- – To check the Fastboot connection, enter the following command and you should see the device ID, as shown in the image:
- – fastboot devices
- – To unlock the bootloader of your Pixel 7a, enter the same command as above:
- – fastboot devices
Unlock Bootloader Google Pixel 7A
To unlock the bootloader on your Pixel 7A, you need to execute a fastboot command from your computer.
Open a command prompt or terminal window on your computer and navigate to the folder where the platform tools are located.
- – Enter the following command to reboot your device to Fastboot Mode:
fastboot reboot bootloader
- – Once your device is in Fastboot Mode, enter the following command to initiate the unlocking process:
fastboot flashing unlock - – You will see a warning message on your device’s screen, asking you to confirm your action. Use the Volume keys to highlight the Unlock the Bootloader option, and press the Power key to select it.
- – Your device will now perform the unlocking operation and reboot to Fastboot Mode again. You can check the Device State at the bottom of the screen. It should say Unlocked, indicating that the bootloader is successfully unlocked.
- – You can now reboot your device to the system by either pressing the Power key once or entering the following command from your computer:
fastboot reboot
You’ve just learned how to unlock the bootloader on your Google Pixel 7/Pro. Congrats! Now you can flash custom ROMs and mods on your device. If you’re stuck or confused about any of the steps, don’t worry. Just drop a comment below and we’ll help you out as soon as possible.